Wednesday, October 26, 2011

Oh Boy!

Guess what!?


We're having a baby boy!

And we're super excited : )


See his little feet?

They're super cute, in case you didn't know.


And as you can see, we're pretty excited - I'm even showing him off in my Halloween costume! (Thanks to this idea from Make it and Love it).


Right now I'm 20 weeks, so that means Baby Boy is due to arrive sometime in the middle of March, and we can hardly wait!

Monday, October 17, 2011

Homemade Half-Pint Canning Rack

Whenever I think of "half pint", I think of Little House on the Prairie (it's what Pa called Laura), and smile a little inside : )  At some point in my growing-up years, though, I realised that a half pint is really just one cup.  And I never understood why people would say "half pint" when they could just say "one cup".  I guess I still don't really understand that one.  Anyway. . .

Is anyone else ever really frustrated when they want to can up something in half pint jars, but their only water-bath canner is made to fit quart jars?  What a waste of time, water, and energy to heat up a pot full of water that is made for quart jars!  Well, obviously, I am frustrated by this.  But, at the same time, I definitely don't want to risk breaking my jars by just sticking them in any old pot and letting them bang around with the force of boiling water!  What's a girl to do?

Why, make her own half-pint sized canning rack of course!

Luckily, I have tons of extra electric fence wire lying around my house (it's a long story), which is really easy to bend into whatever shape you want it.  So, I bent, and bent, and bent some more, until I got what I was looking for!


First, make two rings, one just small enough to fit inside the pot you are intending on using, and one smaller than that.


Then, make three of these thingys in roughly this shape.  (You know, this is a very precise art ;)  The only really important part here is that the middle flat part is wide enough to fit the bottom of your intended jars.


Then, arrange in a criss-cross pattern something like this.  Lastly, put the smaller ring outsidet the bumps around the center of the rack.  Sorry I didn't take a picture of that last bit, but if you have a regular sized canning rack, I think you know what I mean.


I tried fussing around with making it stay together in a nice, sturdy, easily moved manner, but it was getting to be too much of a hassle, so i just put it in the bottom of my pot with a couple empty jars to keep it all in place nicely.  Then I filled it with water and heated it that way.  When I was ready to add my filled jars, I put them in and took out the empty ones, and it kept its shape nicely, even under boiling water.  I suppose if you had a soldering iron it would be really easy to make it nice and sturdy, but since I don't have one, I'll just make it do this way!

Anyway, now I have another size pot I can use for canning!  Mission accomplished!


-------------------------------------------------------------------------------------------------------------

This post has been linked!


Tip Junkie handmade projects

Tuesday, October 11, 2011

Ketchup

Today I made some homemade ketchup.  I have been wanting to try my hand at making ketchup, and since we still have lots of tomatoes from our garden, we figured we might as well use some for this.  Clint found a recipe on a website called the Hungry Mouse.


Recipe originally from Saveur
1 28-oz. can tomato puree (we pureed 2 lbs of our own San Marzano tomatoes)
1 medium yellow onion, peeled and quartered
1 clove garlic, crushed and peeled
1/2 fresh jalapeƱo, stemmed and seeded (we used a whole serrano from our garden)
2 tbsp. dark brown sugar
1/2 cup cider vinegar
1 cup water
Pinch cayenne
Pinch celery salt
Pinch dry mustard
Pinch ground allspice
Pinch ground cloves
Pinch ground ginger
Pinch ground cinnamon
Kosher salt
Freshly ground black pepper

Yields about 4 cups of ketchup

If using your own tomatoes, core them and puree in a blender.  Then, add onion, garlic, hot pepper and brown sugar to the tomato puree in the blender.  Blend until smooth.  Add cider vinegar and water to puree, blend again for about a minute.  Dump mixture into a pot, add spices, mix.  Bring mixture to boil, stirring occasionaly, reduce heat and simmer for 1 hour or until mixture has reached "ketchup" consistency, stirring occasionally.  Put entire mixture through food mill to remove seeds and skins.


Apparently, the ketchup will keep for about 1 month in the fridge.  We tried canning it, but then weren't comfortable eating the results, so I wouldn't recommend doing it that way.  Next time I make it, we'll probably half the recipe and just keep it in the fridge.

Enjoy!


-------------------------------------------------------------------------------------------------------------

This post has been linked!


Tip Junkie handmade projects

Tuesday, October 4, 2011

Quilt Pattern

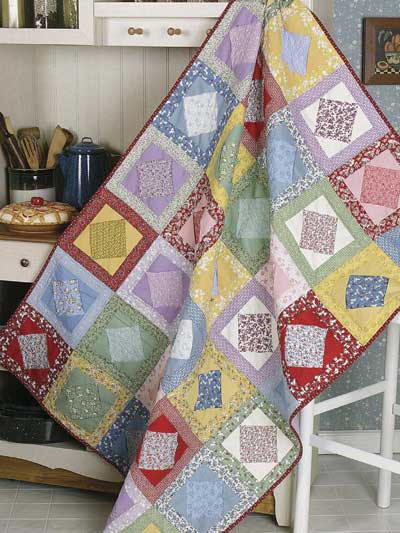
I have had this quilt picked out for quite a while, but I have just now gotten started on it (thanks to encouragement from my amazing husband).  It's called square in a square in a box.  I found it on http://www.free-quilting.com/, but I think it originally was published in Quick and Easy Quilting Magazine in 2002.

Square-in-a-Square in a Box

Of course, my quilt won't look like this, because I'm not really following the color guides exactly, since I've acquired all my fabric from the stashes of various relatives.  And, it will be quite a bit bigger, since I want it to fit our queen size bed.  I think it will take about 210 squares to make it the size we want.  So, I've got a bit of work ahead of me, but that's okay!

Since I've never made a quilt before, and I'm used to using patterns, I decided to go ahead and make a pattern for this quilt design.  Basically, this is it (click to see original size):


I'll post next week about how to assemble the squares, so be sure to look for that!


-------------------------------------------------------------------------------------------------------------

This post has been linked!

Tip Junkie handmade projects

Monday, October 3, 2011

Tortilla Soup

Since it has suddenly decided to become fall around here, we have been able to enjoy soups again!  This is one of our all time favorites, it came from a blog that is no longer active, but still is floating around on the internet at this address.  Anyway, we have modified it a bit (of course), so this is how we do it here:


2 Tbs olive oil
1 onion, chopped
1 bell pepper, chopped
2 cloves garlic, minced (we do more, cuz garlic is yummie!)
1 Tbs ground cumin
28 oz can fire roasted tomatoes (we do 2 pint jars chopped tomatoes or about the equivilant fresh or dried)
1 qt vegetable stock (or chicken)
15 oz can beans, rinsed and drained (we do about 2/3 cup dried black beans in the crock pot on high for a few hours before)
6 corn tortillas, torn up
Salt and pepper
Shredded cheese!

Heat oil in large pot on medium high.  Cook onions and peppers in oil until soft.  Stir in garlic and cumin, cook for 2 minutes.  Pour in tomatoes with juice, stock, beans, and tortilla strips.  Bring to a boil, reduce heat and simmer for 25 minutes.  Check for salt and pepper.  Serve with shredded cheese on top.  Delicious!

The original blog post points out that the recipe is a great vegetarian recipe, and it would still be delicious as a vegan recipe without the cheese.  So, if you happen to have vegan freinds come over for dinner, this would be perfect.  Even if not, it's still a quick, simple, healthy, yummie recipe!


-------------------------------------------------------------------------------------------------------------

This post has been linked!